
What if you could take control of the air you breathe indoors, making sure a healthier and more comfortable environment for you and your loved ones? With indoor air quality directly impacting everything from productivity to long-term health, monitoring CO2 levels has never been more relevant. Yet, many commercial air quality monitors are expensive, limited in functionality, or lack customization options. That’s where this project steps in. By combining the power of a micro:bit development board, a high-accuracy CO2 sensor, and the efficiency of Embedded Rust, you’ll learn how to build a compact, cost-effective, and scalable air quality monitor that’s tailored to your needs. Whether you’re a tech enthusiast or a beginner curious about embedded systems, this guide from The Rusty Bits will show you how to turn a few components into a practical, real-world solution.
In this step-by-step overview, Rusty Bits shows you how to measure CO2 levels using the I2C communication protocol, display real-time data on an LED matrix, and even wirelessly sync your monitor to a mobile app for long-term tracking. Along the way, you’ll explore the benefits of Embedded Rust, from its memory safety features to its modular design capabilities, making your project not only reliable but also future-proof. This isn’t just about building a device—it’s about understanding the tools and techniques that make modern embedded systems so powerful. By the end, you’ll not only have a working air quality monitor but also the skills to expand it with additional sensors or features, turning it into a versatile IoT solution. Isn’t it time you took control of your indoor environment?
DIY Indoor Air Monitor
TL;DR Key Takeaways :
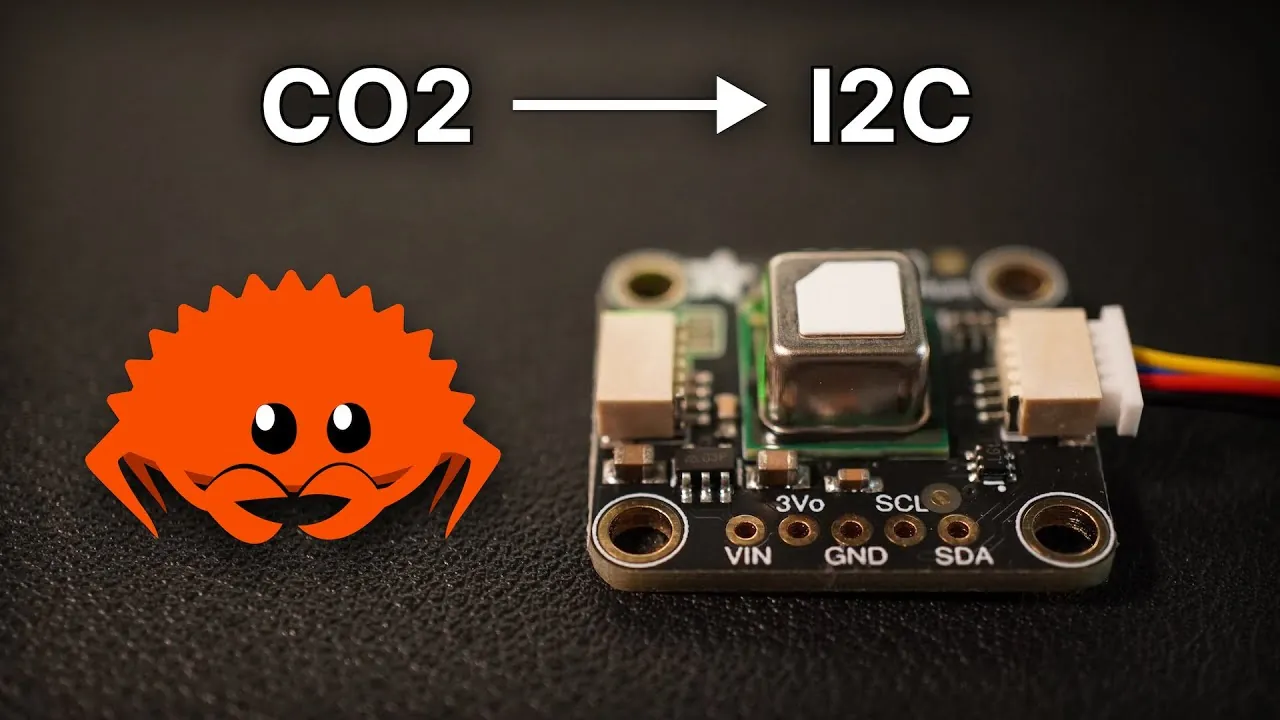
- Build an indoor air quality monitor using a micro:bit, SCD40 CO2 sensor, and Embedded Rust to measure CO2 levels, display data, and enable Bluetooth connectivity for long-term monitoring.
- The system uses I2C communication for sensor integration, Bluetooth for seamless app connectivity, and proper calibration for accurate CO2 measurements.
- Embedded Rust ensures safe, efficient, and modular programming with features like Hardware Abstraction Layers (HAL), concurrency management, and reusable libraries.
- Key hardware includes the micro:bit development board, SCD40 CO2 sensor, and optional accessories like breakout boards for simplified wiring and power management.
- Future enhancements include adding more sensors (e.g., temperature, humidity), refining Bluetooth app integration, and expanding the system for comprehensive air quality analysis.
The air quality monitor you create will measure CO2 levels ranging from 400 to 2000 ppm, providing real-time feedback through the micro:bit’s LED matrix display. Bluetooth connectivity will allow seamless data transmission to a mobile app, allowing users to track air quality trends over time. The project is centered around the micro:bit for its simplicity and versatility, while Embedded Rust ensures safe, efficient, and reliable programming for embedded systems.
This project not only introduces you to embedded systems but also addresses a critical need for monitoring indoor air quality, which is essential for maintaining a healthy living or working environment.
Key Components
To build this system, you’ll need the following hardware:
- Micro:bit Development Board: Acts as the central controller, managing communication, data processing, and user interaction.
- SCD40 CO2 Sensor: A high-accuracy sensor that uses the I2C communication protocol to measure CO2 levels effectively.
- Optional Accessories: Depending on your setup, accessories like a SparkFun breakout board or a BitMaker Light can simplify wiring and power management.
These components ensure seamless integration and reliable performance, forming the foundation of your air quality monitor. The micro:bit’s built-in features, such as the LED matrix and Bluetooth module, reduce the need for additional hardware, making the system compact and efficient.
DIY Air Quality Monitor: Affordable, Accurate, and Customizable
Here are more detailed guides and articles that you may find helpful on air monitoring.
Understanding I2C Communication
I2C (Inter-Integrated Circuit) is a widely used two-wire communication protocol that assists interaction between the micro:bit and the CO2 sensor. It operates using two key lines:
- SDA (Data Line): Transfers data between the micro:bit and the sensor.
- SCL (Clock Line): Synchronizes data transmission to ensure accurate communication.
In this setup, the micro:bit functions as the controller, initiating communication with the sensor, which serves as the target. The process involves sending a start condition, addressing the sensor, exchanging data, and concluding with a stop condition. Proper timing, error handling, and adherence to the I2C protocol are critical to ensure accurate and reliable data transfer.
By mastering I2C communication, you can integrate additional sensors or peripherals into your system, expanding its functionality and versatility.
Why Use Embedded Rust?
Embedded Rust is a powerful tool for developing safe and efficient embedded systems. It offers several advantages that make it ideal for this project:
- Hardware Abstraction Layers (HAL): Simplifies interaction with hardware components like the CO2 sensor, reducing the complexity of low-level programming.
- Concurrency Management: The Embassy framework enables asynchronous programming, allowing tasks such as sensor data collection and Bluetooth communication to run concurrently without blocking the system.
- Reusable Libraries: Existing Rust crates, such as
lib-scd, streamline the integration of sensor drivers, saving development time and effort.
By using Embedded Rust, you can write modular, platform-agnostic code that is both efficient and maintainable. Its strong type system and memory safety features minimize bugs and improve the overall reliability of your project.
Setting Up and Calibrating the Sensor
Proper setup and calibration are essential for accurate CO2 measurements. The SCD40 sensor operates in periodic measurement mode, automatically taking readings at regular intervals. Key steps for setup and calibration include:
- Power-Up Delay: Allow the sensor to stabilize for a few seconds after powering on to ensure accurate readings.
- Automatic Baseline Calibration: The sensor adjusts itself if exposed to fresh air at least once a week, eliminating the need for manual recalibration and simplifying maintenance.
These features make the system user-friendly and ensure reliable performance over time. Additionally, the sensor’s compact design and low power consumption make it suitable for continuous operation in various environments.
Organizing Your Code
A well-structured codebase is crucial for maintaining and expanding your project. Consider the following practices to ensure your code remains clean and manageable:
- Modular Design: Separate functionalities such as I2C communication, sensor data processing, and Bluetooth handling into distinct modules to improve readability and reusability.
- Future-Proofing: Design your code with scalability in mind, allowing for the integration of additional features like new sensors or enhanced data visualization.
- Optimized Logging: Use concise and meaningful log messages to simplify debugging and improve system performance.
These strategies will make your code easier to debug, update, and scale as the project evolves. A modular approach also encourages collaboration and reuse in other embedded projects.
Next Steps
Once the basic system is operational, you can enhance it with additional features to increase its functionality and user appeal:
- LED Matrix Display: Use the micro:bit’s built-in display to show real-time CO2 levels, making the system more interactive and user-friendly.
- Bluetooth App Integration: Refine the Bluetooth connection to enable seamless data transfer to a mobile app for long-term air quality monitoring and analysis.
- Additional Sensors: Expand the system to include temperature, humidity, or particulate matter sensors for a more comprehensive air quality analysis.
These upgrades will transform your air quality monitor into a versatile IoT solution capable of providing detailed insights into indoor environmental conditions. By continuously refining and expanding your project, you can create a tool that not only monitors air quality but also contributes to a healthier and more comfortable living space.
Media Credit: The Rusty Bits
Filed Under: DIY Projects, Gadgets News
Latest Geeky Gadgets Deals
Disclosure: Some of our articles include affiliate links. If you buy something through one of these links, Geeky Gadgets may earn an affiliate commission. Learn about our Disclosure Policy.